Splines Splines Splines!
Something I’ve been meaning to learn for a while is how to make my own splines in Unity. Thanks to this amazing tutorial from CatlikeCoding and fantastic live course on procedural geometry from Freya Holmér, I managed to put together a quick prototype.
I was very much inspired by games like Sonic Adventure 2 and Jet Set Radio, running around and jumping onto rails felt so good, especially when going downhill and picking up speed. I wanted to recreate that feeling myself, and manually modelling all the rails felt like an inefficient solution.
The live course showed how to make a single Bezier curve and generate geometry that follows it, and combining this with the spline tutorial allowed me to make geometry that followed more than just a single segment. After that, it was just a case of working out how to use the spline information for gameplay purposes.
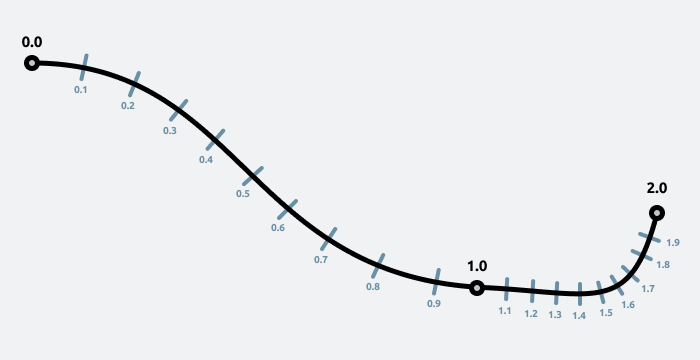
Following a spline is easy enough, you just set an evaluation value (from 0.0 to 1.0) and increment that a little bit each frame to get an object to move. However, there’s no guarantee that each part of the curve is the same length. Some parts may be stretched compared to others, so if you increment your evaluation constantly, the object will change speeds at different points.

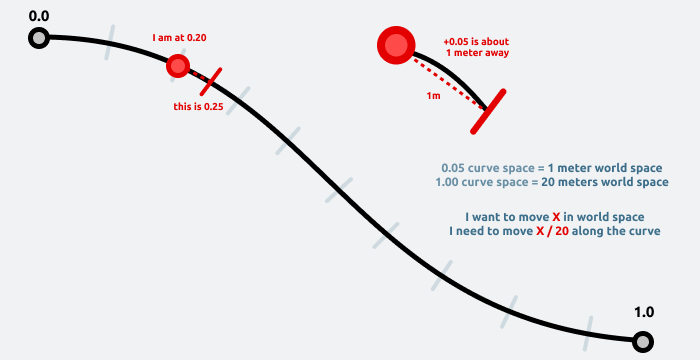
What I really needed was for the player to move a specific distance each frame, which was a bit more complicated. I needed to send the curve a requested distance, and for it to give me back a percentage along the curve that would cover that distance. What I decided on was to first test the curve to see how far in world space I’d travel if I moved 5% along the curve. Then, I’d have a rough mapping between curve space and world space (at this point in the curve).

With that sorted, I could now move a fixed distance each frame, rather than a fixed evaluation amount. This rough estimate was pretty accurate when I tested it, and not super expensive to calculate either. Factoring in gravity when going downhill or uphill and all of a sudden, moving along the rail felt pretty great!
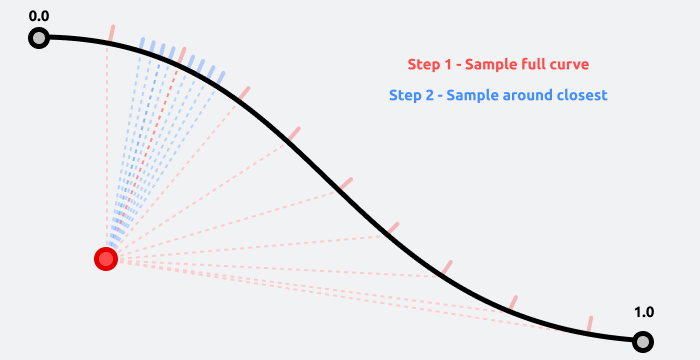
The final problem to solve was actually getting onto the rail in the first place. I added a mesh collider to the rail which meant the player could detect when it hit the rail, but all I would get back is a position in world space – not where that was in curve space. I needed a way to get the closest point on a curve to an arbritrary point in world space.
I figured the best way was to start sampling. I check 32 different points along the curve to find out which one is closest in world space. Once I had roughly the closest point, I’d do sampling around that point another 32 times. This effectively gave me a resolution of 1024 while only needing to sample 64 times, making it considerably cheaper.

Even still, doing 64 samples for every curve that was nearby (every frame) seemed like overkill, so I still only do the sample calculation when the player collides with the rail. This means the code has no idea if a player is close to a rail or not until they hit it, so you need to be exact with the jumping.
I’m pretty happy with how this turned out! You can try it yourself here in the browser.
